RPi 3 and the real time kernel

As a beta tester for MOD I thought it would be cool to play around with netJACK which is supported on the MOD Duo. The MOD Duo can run as a JACK master and you can connect any JACK slave to it as long as it runs a recent version of JACK2. This opens a plethora of possibilities of course. I’m thinking about building a kind of sidecar device to offload some stuff to using netJACK, think of synths like ZynAddSubFX or other CPU greedy plugins like fat1.lv2. But more on that in a later blog post.

So first I need to set up a sidecar device and I sacrificed one of my RPi’s for that, an RPi 3. Flashed an SD card with Raspbian Jessie Lite and started to do some research on the status of real time kernels and the Raspberry Pi because I’d like to use a real time kernel to get sub 5ms system latency. I compiled real time kernels for the RPi before but you had to jump through some hoops to get those running so I hoped things would have improved somewhat. Well, that’s not the case so after having compiled a first real time kernel the RPi froze as soon as I tried to runapt-get install rt-tests. After having applied a patch to fix how the RPi folks implemented the FIQ system the kernel compiled without issues:

Linux raspberrypi 4.9.33-rt23-v7+ #2 SMP PREEMPT RT Sun Jun 25 09:45:58 CEST 2017 armv7l GNU/Linux

And the RPi seems to run stable with acceptable latencies:

Histogram of the latency on the RPi with a real time kernel during 300000 cyclictest loops

So that’s a maximum latency of 75 µs, not bad. I also spotted some higher values around 100 but that’s still okay for this project. The histogram was created with mklatencyplot.bash. I used a different invocation of cyclictest though:

cyclictest -Sm -p 80 -n -i 500 -l 300000

And I ran hackbench in the background to create some load on the RPi:

(while true; do hackbench > /dev/null; done) &

Compiling a real time kernel for the RPi is still not a trivial thing to do and it doesn’t help that the few howto’s on the interwebs are mostly copy-paste work, incomplete and contain routines that are unclear or even unnecessary. One thing that struck me too is that the howto’s about building kernels for RPi’s running Raspbian don’t mention the make deb-pkg routine to build a real time kernel. This will create deb packages that are just so much easier to transfer and install then rsync’ing the kernel image and modules. Let’s break down how I built a real time kernel for the RPi 3.

First you’ll need to git clone the Raspberry Pi kernel repository:

git clone -b 'rpi-4.9.y' --depth 1 https://github.com/raspberrypi/linux.git

This will only clone the rpi-4.9.y branch into a directory called linux without any history so you’re not pulling in hundreds of megs of data. You will also need to clone the tools repository which contains the compiler we need to build a kernel for the Raspberry Pi:

git clone https://github.com/raspberrypi/tools.git

This will end up in the tools directory. Next step is setting some environment variables so subsequent make commands pick those up:

export KERNEL=kernel7
export ARCH=arm
export CROSS_COMPILE=/path/to/tools/arm-bcm2708/gcc-linaro-arm-linux-gnueabihf-raspbian/bin/arm-linux-gnueabihf-
export CONCURRENCY_LEVEL=$(nproc)

The KERNEL variable is needed to create the initial kernel config. The ARCH variable is to indicate which architecture should be used. The CROSS_COMPILE variable indicates where the compiler can be found. The CONCURRENCY_LEVEL variable is set to the number of cores to speed up certain make routines like cleaning up or installing the modules (not the number of jobs, that is done with the -j option of make).

Now that the environment variables are set we can create the initial kernel config:

cd linux
make bcm2709_defconfig

This will create a .config inside the linux directory that holds the initial kernel configuration. Now download the real time patch set and apply it:

cd ..
wget https://www.kernel.org/pub/linux/kernel/projects/rt/4.9/patch-4.9.33-rt23.patch.xz
cd linux
xzcat ../patch-4.9.33-rt23.patch.xz | patch -p1

Most howto’s now continue with building the kernel but that will result in a kernel that will freeze your RPi because of the FIQ system implementation that causes lock ups of the RPi when using threaded interrupts which is the case with real time kernels. That part needs to be patched so download the patch and dry-run it:

cd ..
wget https://www.osadl.org/monitoring/patches/rbs3s/usb-dwc_otg-fix-system-lockup-when-interrupts-are-threaded.patch
cd linux
patch -i ../usb-dwc_otg-fix-system-lockup-when-interrupts-are-threaded.patch -p1 --dry-run

You will notice one hunk will fail, you will have to add that stanza manually so note which hunk it is for which file and at which line it should be added. Now apply the patch:

patch -i ../usb-dwc_otg-fix-system-lockup-when-interrupts-are-threaded.patch -p1

And add the failed hunk manually with your favorite editor. With the FIQ patch in place we’re almost set for compiling the kernel but before we can move on to that step we need to modify the kernel configuration to enable the real time patch set. I prefer doing that with make menuconfig. You will need the libncurses5-dev package to run this commando so install that with apt-get install libncurses5-dev. Then select Kernel Features - Preemption Model - Fully Preemptible Kernel (RT) and select Exit twice. If you’re asked if you want to save your config then confirm. In the Kernel features menu you could also set the the timer frequency to 1000 Hz if you wish, apparently this could improve USB throughput on the RPi (unconfirmed, needs reference). For real time audio and MIDI this setting is irrelevant nowadays though as almost all audio and MIDI applications use the hr-timer module which has a way higher resolution.

With our configuration saved we can start compiling. Clean up first, then disable some debugging options which could cause some overhead, compile the kernel and finally create ready to install deb packages:

make clean
scripts/config --disable DEBUG_INFO
make -j$(nproc) deb-pkg

Sit back, enjoy a cuppa and when building has finished without errors deb packages should be created in the directory above the linux one. Copy the deb packages to your RPi and install them on the RPi with dpkg -i. Open up /boot/config.txt and add the following line to it:

kernel=vmlinuz-4.9.33-rt23-v7+

Now reboot your RPi and it should boot with the realtime kernel. You can check with uname -a:

Linux raspberrypi 4.9.33-rt23-v7+ #2 SMP PREEMPT RT Sun Jun 25 09:45:58 CEST 2017 armv7l GNU/Linux

Since Rasbian uses almost the same kernel source as the one we just built it is not necessary to copy any dtb files. Also running mkknlimg is not necessary anymore, the RPi boot process can handle vmlinuz files just fine.

The basis of the sidecar unit is now done. Next up is tweaking the OS and setting up netJACK.

Edit: there’s a thread on LinuxMusicians referring to this article which already contains some very useful additional information.
RPi 3 and the real time kernel

Using a Qtractor MIDI track for both MIDI and audio

Basically Qtractor only does either MIDI or audio. The MIDI tracks are for processing MIDI and the audio tracks for processing audio. But a MIDI track in Qtractor can also post-process the audio coming out of a synth plug-in with FX plug-ins so it’s a bit more than just a MIDI track.

But what about plug-ins that do both audio and MIDI, like the LV2 version of the autotuner application zita-at1? If you put it in an audio track it will happily autotune all the audio but it won’t accept any incoming MIDI to pitch only to the MIDI notes it is being fed. And no way you can get MIDI into a Qtractor audio track. There’s no MIDI insert plug-in or the possibility to somehow expose MIDI IN ports of a plug-in in an audio track to Jack MIDI or ALSA.

But Qtractor does have a built-in Insert plug-in that can be fed audio from an audio bus and since a Qtractor MIDI track does know how to handle audio would it also know how to deal with such an insert? Well, yes it can which allows you to use a plug-in like the LV2 version of zita-at1 inside a MIDI track.

Setting up buses and tracks

You will need at least one bus and two tracks (of course you can use different bus and track names):

  • AutoTuneMix bus, input only and 2 channels
  • AutoTune MIDI track with dedicated audio outputs (this will create an audio bus called AutoTune)
  • AutoTuneMix audio track with the AutoTuneMix as input bus

Alternatively you could also skip the use of dedicated audio outputs and have the MIDI track output to the Master bus. This way you avoid the risk of introducing extra latency and the need to set up extra connections. You do lose the flexibility then to do basic stuff on the outcoming audio like panning or adjusting the gain. Which you can also workaround of course by using additional panning and/or gain plug-ins.

Once you’ve created the bus and the tracks insert the following plug-ins into the AutoTune MIDI track:

  • Insert
  • Any pre-processing effects plug-ins (like a compressor) – optional
  • LV2 version of zita-at1 autotuner
  • Any post-processing effects plug-ins (like a reverb) – optional

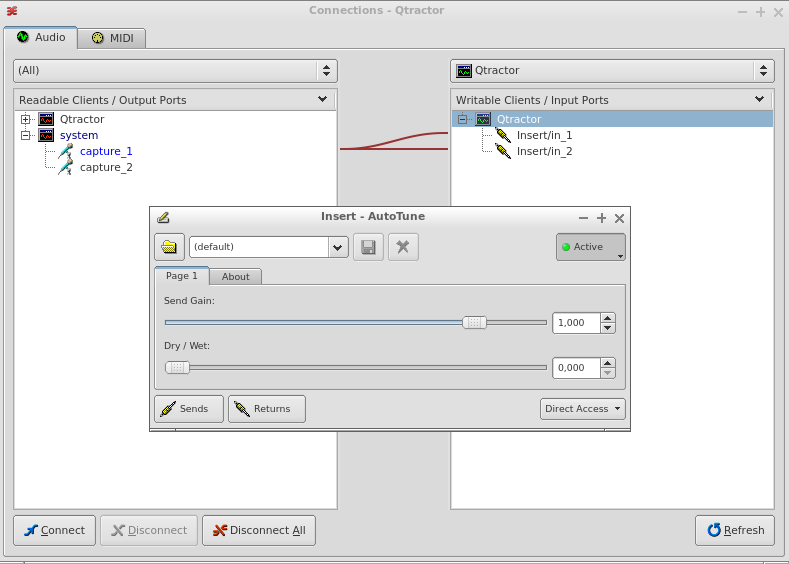
Insert them into this specific order. It is also possible to do the post-processing in the AutoTuneMix audio track. Now open the Properties window of the Insert plug-in and then open the Returns window. Connect the mic input of your audio device to the Insert/in ports as shown below.

Qtractor AutoTune Insert

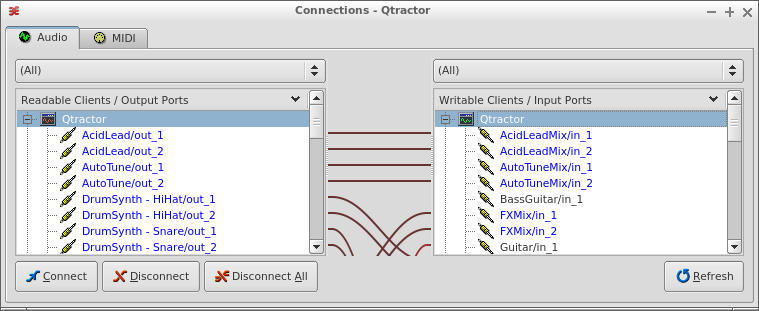
Connect the AutoTune bus outputs to the AutoTuneMix inputs:

Qtractor Connections

Create a MIDI clip with notes to autotune

Create a MIDI clip with the notes you would like to get autotuned in the AutoTune MIDI track, put the play-head on the right position and press play. Now incoming audio from the mic input of your audio device should get autotuned to the MIDI notes you entered in the MIDI clip:

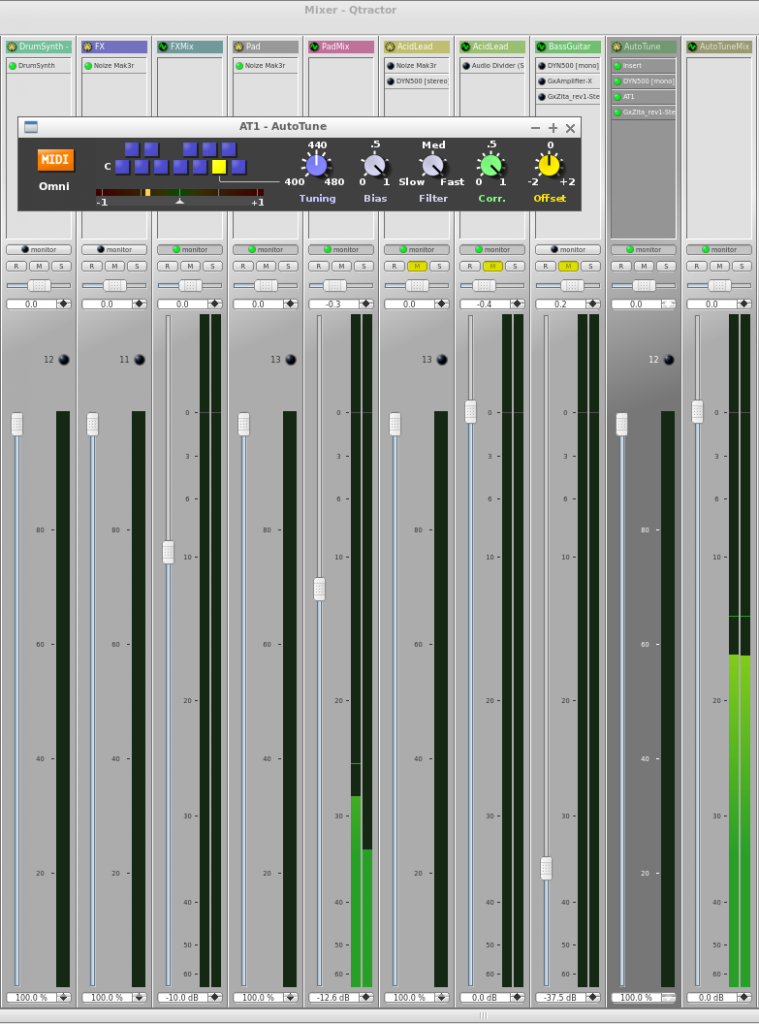
Qtractor Mixer with LV2 version of zita-at1 autotuner

As you can see both MIDI and audio goes through the AT1 autotuner plug-in and the outcoming audio is being fed into the AutoTuneMix track where you can do the rest of your post-processing if you wish.

Using a Qtractor MIDI track for both MIDI and audio

The hardest part

At least, for me. Now I have to code something that enables me to select banks and instruments on my synth module. I’ve settled for pyliblo to talk to ZynAddSubFX but I’m just no coder. My elbow now rests on “Learning Python” from O’Reilly, I started reading it like a year ago but never got past chapter 3 or something. Time to persist, I’ve been wanting to be able to code a little bit for years now.

As a note to self, and maybe it’s helpful for others too, what follows are some of the relevant OSC messages to change banks and instruments in ZynAddSubFX.

Changing banks can be done with /loadbank. pyliblo comes with an example script send_osc.py and loading a bank with send_osc.py works as follows:

send_osc.py 7777 /loadbank ,i 3

7777 is the port ZynAddSubFX runs on. The /loadbank message wants an integer (,i) and ,i 3 loads the fourth bank (Choir and Voice) as ZynAddSubFX starts counting from 0. Bear in mind that this will only load the bank, it won’t change the instrument that is loaded. To load an instrument from a loaded bank the following send_osc.py incantation does the trick:

send_osc.py 7777 /setprogram ,c $'\x03'

So /setprogram loads an instrument from an active bank. It takes a character (,c) as an argument because the program numbers are in hex. But hex are multiple characters so you have to add some escape sequences to make it work (and I lost it there so I could be completely wrong). The above command should load the fourth instrument from the Choir and Voice bank (Voice OOH) as that bank should have been loaded by the previous /loadbank message.

It is also possible to load instrument (.xiz) files. This can be done with the /load_xiz message:

send_osc.py 7777 /load_xiz 0 "/usr/share/zynaddsubfx/banks/Bass/0001-Bass 1.xiz"

This will load the Bass 1 instrument fom the Bass bank into part 1 (remember that ZynAddSubFX starts counting from 0). So to load the Bass 2 instrument into part 2 you’d do the following:

send_osc.py 7777 /load_xiz 1 "/usr/share/zynaddsubfx/banks/Bass/0002-Bass 2.xiz"

So now I have to incorporate this stuff into Python code that gets called when I press buttons on my LCD display. These are the mappings I’d like to accomplish:

  • Up: toggle next bank and display first instrument from that bank
  • Down: toggle previous bank and display first instrument from that bank
  • Left: toggle previous instrument and display instrument
  • Right: toggle next instrument and display instrument
  • Select: select displayed instrument

That shouldn’t be too hard right? Well, first hurdle, pyliblo can only send or dump OSC messages, it doesn’t seem to be able to handle return messages from the OSC server (ZynAddSubFX in this case). To be continued…

Edit: of course sending just messages with pyliblo won’t handle any return messages, you will need a receiving part. But maybe I should take a look at using MIDI with mididings for instance. Thanks Georg Mill for the tip!

The hardest part

Working on a stable setup

Next step for the synth module project was to get the Raspberry Pi 2 to run in a stable manner. It seems like I’m getting close or that I’m already there. First I built a new RT kernel based on the 4.1.7 release of the RPi kernel. Therefore I had to checkout an older git commit because the RPi kernel is already at 4.1.8. The 4.1.7-rt8 patchset applied cleanly and the kernel booted right away:

pi@rpi-jessie:~$ uname -a
 Linux rpi-jessie 4.1.7-rt8-v7 #1 SMP PREEMPT RT Sun Sep 27 19:41:20 CEST 2015 armv7l GNU/Linux

After cleaning up my cmdline.txt it seems to run fine without any hiccups so far. My cmdline.txt now looks like this:

dwc_otg.lpm_enable=0 dwc_otg.speed=1 console=ttyAMA0,115200 console=tty1 root=/dev/mmcblk0p2 rootfstype=ext4 rootflags=data=writeback elevator=deadline rootwait

Setting USB speed to Full Speed (so USB1.1) by using dwc_otg.speed=1 is necessary otherwise the audio coming out of my USB DAC sounds distorted.

I’m starting ZynAddSubFX as follows:

zynaddsubfx -r 48000 -b 64 -I alsa -O alsa -P 7777 -L /usr/share/zynaddsubfx/banks/SynthPiano/0040-BinaryPiano2.xiz

With a buffer of 64 frames latency is very low and so far I haven’t run into instruments that cause a lot of xruns with this buffer size. Not even the multi-layered ones from Will Godfrey.

So I guess it’s time for the next step, creating a systemd startup unit so that ZynAddSubFX starts at boot. And it would be nice if USB MIDI devices would get connected automatically. And if you could see somehow which instrument is loaded, an LCD display would be great for this. Also I’d like to have the state of the synth saved, maybe by saving an .xmz file whenever there’s a state change or on regular intervals. And the synth module will need a housing or casing. Well, let’s get the software stuff down first.

Working on a stable setup

Building a synth module using a Raspberry Pi

Ever since I did an acid set with my brother in law at the now closed bar De Vinger I’ve been playing with the idea of creating some kind of synth module out of a Raspberry Pi. The Raspberry Pi 2 should be powerful enough to run a complex synth like ZynAddSubFX. When version  2.5.1 of that synth got released the idea resurfaced again since that version allows to remote control a running headless instance of ZynAddSubFX via OSC that is running on for instance a Raspberry Pi. I looked at this functionality before a few months ago but the developer was just starting to implement this feature so it wasn’t very usable yet.

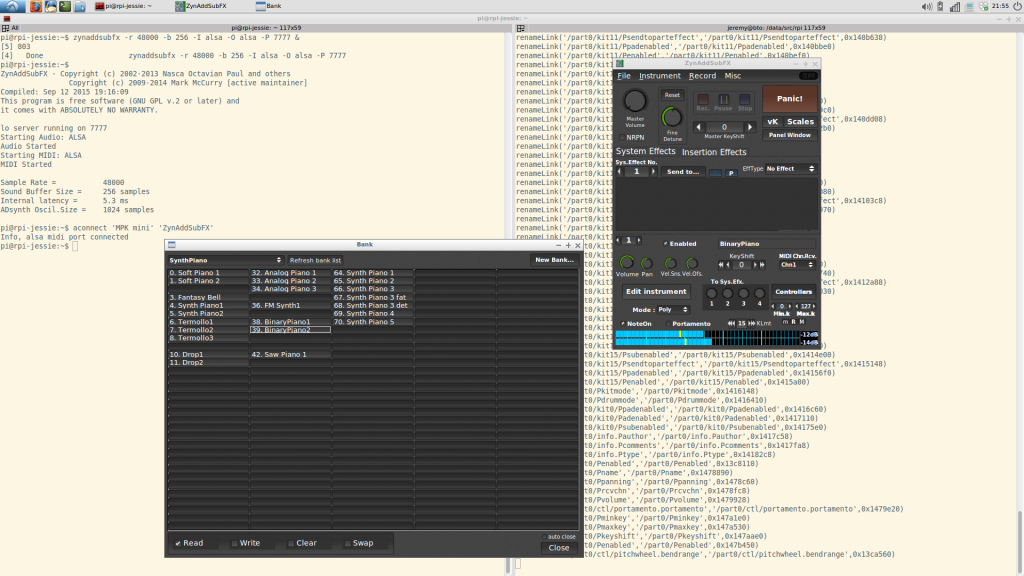
zynaddsubfx-ext-guiBut with the release of ZynAddSubFX 2.5.1 the stabilitity of the zynaddsubfx-ext-gui utility has improved to such an extent that it’s a very usable tool. In the above screenshot you can see zynaddsubfx-ext-gui running on my notebook with Ubuntu 14.04 controlling a remote instance of ZynAddSubFX running on a Raspberry Pi.

So basically all the necessary building blocks for a synth module are there. Coupled with my battered Akai MPK Mini and a cheap PCM2704 USB DAC I started setting up a test setup.

For the OS on the Raspberry Pi 2 I chose Debian Jessie as I feel Raspbian isn’t getting you the most out of your Pi. It’s running a 4.1.6 kernel with the 4.1.5-rt5 RT patch set, which applied cleanly and seems to run so far:

pi@rpi-jessie:~$ uname -a
Linux rpi-jessie 4.1.6-rt0-v7 #1 SMP PREEMPT RT Sun Sep 13 21:01:19 CEST 2015 armv7l GNU/Linux

This isn’t a very clean solution of course so let’s hope a real 4.1.6 RT patch set will happen or maybe I could give the 4.1.6 PREEMPT kernel that rpi-update installed a try. I packaged a headless ZynAddSubFX for the RPi on my notebook using pbuilder with a Jessie armhf root and installed the package for Ubuntu 14.04 from the KXStudio repos. I slightly overclocked the RPi to 1000MHz and set the CPU scaling governor to performance. The filesystem is Ext4, mounted with noatime,nobarrier,data=writeback.

To get the USB audio interface and the USB MIDI keyboard into line I had to add the following line to my /etc/modprobe.d/alsa.conf file:

options snd-usb-audio index=0,1 vid=0x08bb,0x09e8 pid=0x2704,0x007c

This makes sure the DAC gets loaded as the first audio interface, so with index 0. Before adding this line the Akai would claim index 0 and since I’m using ZynAddSubFX with ALSA it couldn’t find an audio interface. But all is fine now:

pi@rpi-jessie:~$ cat /proc/asound/cards
 0 [DAC            ]: USB-Audio - USB Audio DAC
                      Burr-Brown from TI USB Audio DAC at usb-bcm2708_usb-1.3, full speed
 1 [mini           ]: USB-Audio - MPK mini
                      AKAI PROFESSIONAL,LP MPK mini at usb-bcm2708_usb-1.5, full speed

So no JACK as the audio back-end, the output is going directly to ALSA. I’ve decided to do it this way because I will only be running one single application that uses the audio interface so basically I don’t need JACK. And JACK tends to add a bit of overhead, you barely notice this on a PC system but on small systems like the Raspberry Pi JACK can consume a noticeable amount of resources. To make ZynAddSubFX use ALSA as the back-end I’m starting it with the -O alsa option:

zynaddsubfx -r 48000 -b 256 -I alsa -O alsa -P 7777

The -r option sets the sample rate, the -b option sets the buffer size, -I is for the MIDI input and the -P option sets the UDP port on which ZynAddSubFX starts listening for OSC messages. And now that’s the cool part. If you then start zynaddsubfx-ext-gui on another machine on the network and tell it to connect to this port it starts only the GUI and sends all changes to the GUI as OSC messages to the headless instance it is connected to:

zynaddsubfx-ext-gui osc.udp://10.42.0.83:7777

Next up is stabilizing this setup and testing with other kernels or kernel configs as the kernel I’ve cooked up now isn’t a viable long-term solution. And I’d like to add a physical MIDI in and maybe a display like described on the Samplerbox site. And the project needs a casing of course.

Building a synth module using a Raspberry Pi

LAC2014: submission accepted!

My submission for the Linux Sound Night at LAC2014 with The Infinite Repeat has been accepted. The Call for Papers page mentions the term “danceable” so I’m going to focus on that. Making danceable music is quite a challenge for me but it should definitely be doable to produce a solid set, especially now that I’m the proud owner of a Korg Volca Keys. I’m definitely going to integrate it in my current setup as the Volca reacts great on MIDI sent from my workstation. It has some fat sounds that just scream dance floor.


Korga Volca Keys

I’m really looking forward to this year’s LAC. It seems falkTX and avlinux are going too, it’d be great to meet these guys in real life!

LAC2014: submission accepted!

Raspberry Jam Review

Last Thursday the first Dutch Raspberry Jam took place at the Ordina HQ in Nieuwegein. I offered to do a presentation slash demonstration about realtime audio and the the Raspberry Pi so I promised myself to be there at least an hour before the scheduled starting time of my demo. That way I could also join Gert van Loo‘s presentation. When I arrived at 19:15 there was no Gert van Loo though so that should’ve triggered some alarms. Also I didn’t look out for members of the organization as soon as I came in. Instead I chose to dot the i’s and cross the t’s with regards to my demo.

Wrong decision.

About half an hour later the event was closed.

WTF?

I approached the person who closed the event and introduced myself. He replied that they thought I wasn’t coming anymore. Apparently they misinterpreted my e-mail I sent earlier that day that I didn’t manage to produce something workable for the laser show guy. They took it for a cancellation. But immediately the event got kind of reopened and I set up my stuff. We had some audio issues but in the end everything went quite well actually. I showed off what is possible with a Raspberry Pi and realtime audio with the use of some of my favorite software. Guitarix featured of course. I grabbed my guitar, fired up guitarix on the RPi and played some stuff. Hooked up my MIDI foot controller and showed how to select different presets. I also demonstrated the use of the RPi as a piano with the help of LinuxSampler and the awesome Salamander Grand Piano samplepack and did some drumming by using drumkv1. Before the realtime audio demo I presented an overview of the Linux audio ecosystem and talked about the alternatives of how to get sound in and out of your Raspberry Pi. These alternatives are not bound to the onboard sound and USB, since recently it is also possible to hook up an external audio codec to the I2S bus of the Raspberry Pi. I got one in myself this week, a MikroElektronika Audio Codec PROTO board based on the WM8731 codec, so more on that soon. It’d be awesome if I can get that codec to work reliably at lower latencies.

So it all turned out well, I had a great time doing my presentation and judging by the interest shown by some attendants who came up to me after the presentation I hope I got some more people enthusiastic about doing realtime audio with the Raspberry Pi and Linux. So thanks Ordina for offering this opportunity and thanks everyone who stuck around!

Raspberry Jam Review

Ardour with video and LV2 MIDI plugins chaining support

Got so absorbed hacking my UG802 that I completely missed this: https://community.ardour.org/node/7219

So not only can you add video to your Ardour project but now it’s also possible to chain multiple LV2 plugins that accept MIDI. The video support is the great work of Robin Gareus and it was actually a presentation on this functionality that got me acquainted with the Linux Audio meetings at the HKU almost 3 years ago. So yes, he’s been working on it quite a while so I assume it works well.

I have actually never worked with Ardour, I’ve always used Qtractor. But maybe it’s getting time to check out Ardour too, especially now that the MIDI part is stabilizing.

Ardour with video and LV2 MIDI plugins chaining support

Raspberry Pi als virtuele gitaarversterker: MIDI en effecten

Live demo van m’n Raspberry Pi, guitarix en een MIDI floorboard.

Raspberry Pi als virtuele gitaarversterker: MIDI en effecten

Eerste DX bestelling binnen

M’n MIDI to USB kabel en oprolbaar USB drumpad zijn binnen.

MIDI to USB kabel:

jeremy@piertje:~$ cat /proc/asound/cards
...
 1 [USB20MIDI      ]: USB-Audio - USB2.0-MIDI
                      USB2.0-MIDI at usb-0000:00:1d.0-1, full speed

USB drumpad werd in eerste instantie niet goed herkend:

jeremy@piertje:~$ lsusb
...
Bus 005 Device 014: ID 1941:8021 Dream Link WH1080 Weather Station / USB Missile Launcher

USB Missile Launcher? Even googlen, ah: https://bugs.launchpad.net/ubuntu/+source/usbutils/+bug/377967
Maar dan nog, ik weet toch bijna zeker dat dit ding gewoon meteen hoort te werken. Dus even checken met het drumpadje wat ik in bruikleen heb:

jeremy@piertje:~$ lsusb
...
Bus 005 Device 015: ID 0218:0001 Hangzhou Worlde

Dus er klopt iets niet helemaal, moet recht te trekken zijn. Na wat verder gegoogled te hebben kwam ik hier op uit: https://code.google.com/p/drumroll

Code gecompiled en het draait. Maar vrees dat ik de drumpad niet met mijn RPi kan gebruiken want de drumroll binary verstookt op mijn notebook al 4% aan CPU. Maar zien wat ik met de drumpad ga doen, sowieso kijken of ik er ergens een kan vinden die wel een USB MIDI device is.

Eerste DX bestelling binnen