Using the Tascam US-144MKII with Linux

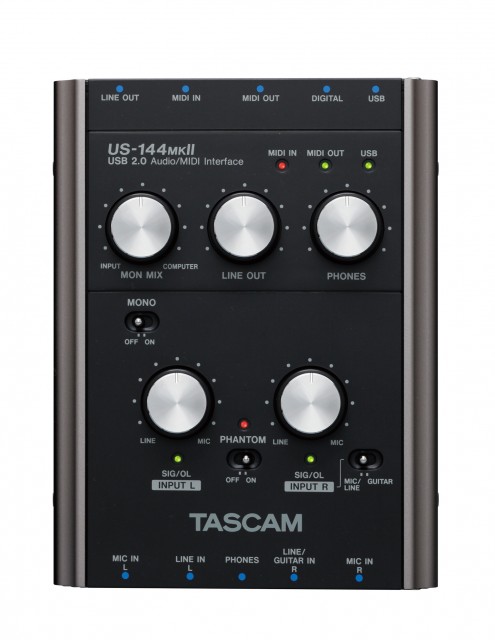
Today I got a Tascam US-144MKII from a colleague because he couldn’t use it anymore with Mac OSX. Apparently this USB2.0 audio interface stopped working on El Capitan. Tascam claims they’re working on a driver but they’re only generating bad publicity with that announcement it seems. So he gave it to me, maybe it would work on Linux.

Tascam US-144MKII
Tascam US-144MKII

First thing I did was plugging it in. The snd_usb_122l module got loaded but that was about it. So much for plug and play. There are reports though that this interface should work so when I got home I started digging a bit deeper. Apparently you have to disable the ehci_hcd USB driver, which is actually the USB2.0 controller driver, and force the US-144MKII to use the uhci_hcd USB1.1 driver instead so that it thinks it’s in USB1.1 mode. This limits the capabilities of the device but my goal for today was to get sound out of this interface, not getting the most out of it.

I quickly found out that on my trusty XPS13 forcing USB1.1 was probably not going to work because it only has USB3.0 ports. So I can disable the ehci_hcd driver but then it seems the xhci_hcd USB3.0 driver takes over. And disabling that driver effectively disables all USB ports. So I grabbed an older notebook with USB2.0 ports and disabled the ehci_hcd driver by unbinding it since it’s not compiled as a module. Unbinding a driver is done by writing the system ID of a device to a so-called unbind file of the driver that is bound to this device. In this case we’re interested in the system ID’s of the devices that use the ehci_hcd driver which can be found in /sys/bus/drivers/ehci-pci/:

# ls /sys/bus/pci/drivers/ehci-pci/
0000:00:1a.7  bind  new_id  remove_id  uevent  unbind
# echo -n "0000:00:1a.7" > /sys/bus/pci/drivers/ehci-pci/unbind

This will unbind the ehci_hcd driver from the device with system ID 0000:00:1a.7 which in this case is an USB2.0 controller.When plugging in the USB interface it now got properly picked up by the system and I was greeted with an active green USB led on the interface as proof.

$ cat /proc/asound/cards
 0 [Intel          ]: HDA-Intel - HDA Intel
                      HDA Intel at 0xf4800000 irq 46
 1 [US122L         ]: USB US-122L - TASCAM US-122L
                      TASCAM US-122L (644:8020 if 0 at 006/002

So ALSA picked it up as a device but it doesn’t show up in the list of sound cards when issuing aplay -l. This is because you have to tell ALSA to talk to the device in a different way then to a normal audio interface. Normally an audio interface can be addressed by using the hw plugin which is the most low-level ALSA plugin that does nothing more than talking to the driver and this is what most applications use, including JACK. The US-144MKII works differently though, its driver snd_usb_122l has to be accessed with the use of the usb_stream plugin which is part of the libasound2-plugins package and that allows you to set a PCM device name that can be used with JACK for instance. This can be done with the following .asoundrc file that you have to create in the root of your home directory:

pcm.us-144mkii {
        type usb_stream
        card "US122L"
}

ctl.us-144mkii {
        type hw
        card "US122L"
}

What we do here is creating a PCM device called us-144mkii and coupling that to the card name we got from cat /proc/asound/cards which is US122L. Of course you can name the PCM device anything you want. Almost all other examples name it usb_stream but that’s a bit confusing because that is the name of the plugin and you’d rather have a name that has some relation to the device you’re using. Also practically all examples use card numbers. But who says that the USB audio interface will always be card 0, or 1. It could also be 2, or 10 if you have 9 other audio interfaces. Other examples work around this by fixing the order of the numbers that get assigned to each available audio interface by adjusting the index parameter for the snd_usb_122l driver. But why do that when ALSA also accepts the name of the card? This also makes thing a lot easier to read, it’s now clear that we are coupling the PCM name us-144mkii to the card named US122L. And we’re avoiding having to edit system-wide settings. The ctl stanza is not strictly necessary but it prevents the following warning when starting JACK:

ALSA lib control.c:953:(snd_ctl_open_noupdate) Invalid CTL us-144mkii
control open "us-144mkii" (No such file or directory)

So with the .asoundrc in place you can try starting JACK:

$ jackd -P85 -t2000 -dalsa -r48000 -p512 -n2 -Cus-144mkii -Pus-144mkii
jackd 0.124.2
Copyright 2001-2009 Paul Davis, Stephane Letz, Jack O'Quinn, Torben Hohn and others.
jackd comes with ABSOLUTELY NO WARRANTY
This is free software, and you are welcome to redistribute it
under certain conditions; see the file COPYING for details

no message buffer overruns
JACK compiled with System V SHM support.
loading driver ..
apparent rate = 48000
creating alsa driver ... us-144mkii|us-144mkii|512|2|48000|0|0|nomon|swmeter|-|32bit
configuring for 48000Hz, period = 512 frames (10.7 ms), buffer = 2 periods
ALSA: final selected sample format for capture: 24bit little-endian in 3bytes format
ALSA: use 2 periods for capture
ALSA: final selected sample format for playback: 24bit little-endian in 3bytes format
ALSA: use 2 periods for playback

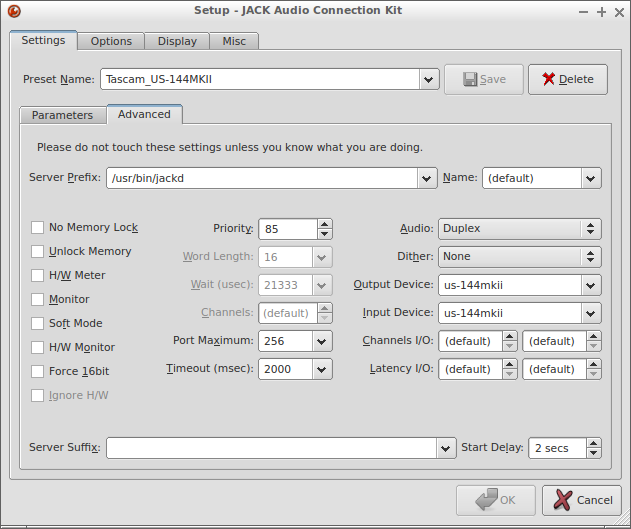
This translates to the following settings in QjackCtl:

QjackCtl Settings – Parameters
QjackCtl Settings – Advanced

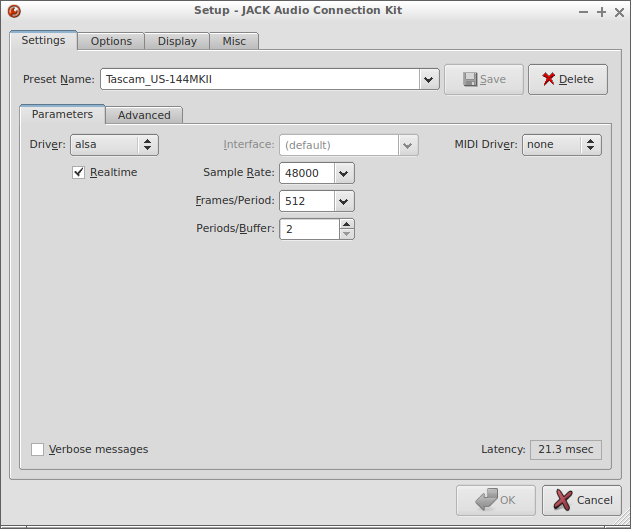
Don’t expect miracles of this setup. You won’t be able to achieve super low-latencies but at least you can still use your Tascam US-144MKII instead of having to give it away to a colleague.

Using the Tascam US-144MKII with Linux

Resolved JACK issues on notebook

Finally got around troubleshooting the issues I was facing with JACK on my notebook, a BTO that is actually a Clevo W170ER. Somehow I couldn’t go lower than -p128 with USB audio interfaces. When I thought I had tried every option, even disabling hyperthreading, I noticed two unidentified entries in my lsusb output:

Bus 001 Device 003: ID 8087:07da Intel Corp. 
Bus 002 Device 003: ID 5986:0401 Acer, Inc

The first entry is a Bluetooth adapter and the second entry is a webcam. Both devices are unnecessary when making music so I thought, why not unbind them. First I had to figure out their respective bus ID’s:

$ tree /sys/bus/usb/drivers/usb
/sys/bus/usb/drivers/usb
??? 1-1 -> ../../../../devices/pci0000:00/0000:00:1a.0/usb1/1-1
??? 1-1.3 -> ../../../../devices/pci0000:00/0000:00:1a.0/usb1/1-1/1-1.3
??? 2-1 -> ../../../../devices/pci0000:00/0000:00:1d.0/usb2/2-1
??? 2-1.6 -> ../../../../devices/pci0000:00/0000:00:1d.0/usb2/2-1/2-1.6
??? bind
??? uevent
??? unbind
??? usb1 -> ../../../../devices/pci0000:00/0000:00:1a.0/usb1
??? usb2 -> ../../../../devices/pci0000:00/0000:00:1d.0/usb2
??? usb3 -> ../../../../devices/pci0000:00/0000:00:14.0/usb3
??? usb4 -> ../../../../devices/pci0000:00/0000:00:14.0/usb4

Since the Bluetooth adapter sits on bus 1 and the webcam on bus two their respective ID’s should be 1-1 and 2-1. So I echoed the ID’s to the unbind file in the same directory:

$ echo -n "1-1" | sudo tee /sys/bus/usb/drivers/usb/unbind
$ echo -n "2-1" | sudo tee /sys/bus/usb/drivers/usb/unbind

Good riddance:

$ lsusb
Bus 001 Device 002: ID 8087:0024 Intel Corp. Integrated Rate Matching Hub
Bus 002 Device 002: ID 8087:0024 Intel Corp. Integrated Rate Matching Hub
Bus 001 Device 001: ID 1d6b:0002 Linux Foundation 2.0 root hub
Bus 002 Device 001: ID 1d6b:0002 Linux Foundation 2.0 root hub
Bus 003 Device 001: ID 1d6b:0002 Linux Foundation 2.0 root hub
Bus 004 Device 001: ID 1d6b:0003 Linux Foundation 3.0 root hub

Then I started JACK again with -p64 using an USB audio interface connected to bus 3 (so no rate matching hub in between) and no more xruns, not even with a generic kernel and using WiFi and all. Next hurdle is the onboard sound. Below -p128 I get bursts of massive xruns and so far I didn’t manage to pinpoint the culprit.

Edit #1: I’ve found out that the Bluetooth adapter is the main bottleneck. Also, by echoing the aformentioned ID’s (1-1 and 2-1) you disable the whole USB bus apparently. To disable just the USB device echo the last ID in the respective path names, so for the Bluetooth adapter that’s 1-1.3 and for the webcam 2-1.6. This way you can still use the USB bus on which these devices are residing. In my case disabling the whole bus is not an option, this would mean I’d have to connect all my USB interfaces to bus 3 (bus 4 doesn’t have any external inputs) which could result in these devices getting in each other’s way with regard to bandwidth. After echoing the ID’s the output of the tree command looks like this:

$ tree /sys/bus/usb/drivers/usb
/sys/bus/usb/drivers/usb
??? 1-1 -> ../../../../devices/pci0000:00/0000:00:1a.0/usb1/1-1
??? 2-1 -> ../../../../devices/pci0000:00/0000:00:1d.0/usb2/2-1
??? bind
??? uevent
??? unbind
??? usb1 -> ../../../../devices/pci0000:00/0000:00:1a.0/usb1
??? usb2 -> ../../../../devices/pci0000:00/0000:00:1d.0/usb2
??? usb3 -> ../../../../devices/pci0000:00/0000:00:14.0/usb3
??? usb4 -> ../../../../devices/pci0000:00/0000:00:14.0/usb4

The lsusb command still shows the devices though.

Edit #2: unbinding drivers like described above won’t persist across reboots. If you’d like to make the unbinding persistent you could add the unbind command to /etc/rc.local or create a script that runs at login. There are other options of course like blacklisting the Bluetooth drivers.

Resolved JACK issues on notebook

Using a Raspberry Pi as a piano

Recently I posted about my successful attempt to get LinuxSampler running on the Raspberry Pi. I’ve taken this a bit further and produced a script that turns the Raspberry Pi into a fully fledged piano. Don’t expect miracles, the sample library I used is good quality so the RPi might choke on it every now and then with regard to disk IO. But it’s usable if you don’t play too many notes at once or make extensive use of a sustain pedal. I’ve tested the script with a Class 4 SD though so a faster SD card could improve stability.

Edit: finally got around buying a better SD card and the difference is huge! I bought a SanDisk Extreme Class 10 SD card and with this SD card I can run LinuxSampler at lower latencies and I can play more notes at once.

Before you can run the script on your Raspberry Pi you will need to tweak your Raspbian installation so you can do low latency audio. How to achieve this is all described in the Raspberry Pi wiki article I’ve put up on wiki.linuxaudio.org. After you’ve set up your RPi you will need to install JACK and LinuxSampler with sudo apt-get install jackd1 linuxsampler. Next step is to get the Salamander Grand Piano sample pack on your RPi:

cd
mkdir LinuxSampler
cd LinuxSampler
wget -c http://download.linuxaudio.org/lau/SalamanderGrandPianoV2
/SalamanderGrandPianoV2_44.1khz16bit.tar.bz2
wget -c http://dl.dropbox.com/u/16547648/sgp44.1khz_V2toV3.tar.bz2
tar jxvf SalamanderGrandPianoV2/SalamanderGrandPianoV2_44.1khz16bit.tar.bz2
tar jxvf sgp44.1khz_V2toV3.tar.bz2 -C SalamanderGrandPianoV2_44.1khz16bit
--strip-components=1

Please note that decompressing the tarballs on the RPi could take some time. Now that you’ve set up the Salamander Grand Piano sample library you can download the script and the LinuxSampler config file:

cd
mkdir bin
wget -c https://raw.github.com/AutoStatic/scripts/rpi/piano -O /home/pi/bin/piano
chmod +x bin/piano
wget -c https://raw.github.com/AutoStatic/configs/rpi/home/pi/LinuxSampler
/SalamanderGrandPianoV3.lscp -O
/home/pi/LinuxSampler/SalamanderGrandPianoV3.lscp

Almost there. We’ve installed the necessary software and downloaded the sample library, LinuxSampler config and piano script. Now we need to dot the i’s and cross the t’s because the script assumes some defaults that might be different in your setup. Let’s dissect the script:

#!/bin/bash

if ! pidof jackd &> /dev/null
then
  sudo killall ifplugd &> /dev/null
  sudo killall dhclient-bin &> /dev/null
  sudo service ntp stop &> /dev/null
  sudo service triggerhappy stop &> /dev/null
  sudo service ifplugd stop &> /dev/null
  sudo service dbus stop &> /dev/null
  sudo killall console-kit-daemon &> /dev/null
  sudo killall polkitd &> /dev/null
  killall gvfsd &> /dev/null
  killall dbus-daemon &> /dev/null
  killall dbus-launch &> /dev/null
  sudo mount -o remount,size=128M /dev/shm &> /dev/null
  echo -n performance
| sudo tee /sys/devices/system/cpu/cpu0/cpufreq/scaling_governor &> /dev/null
  if ip addr | grep wlan &> /dev/null
  then
    echo -n "1-1.1:1.0" | sudo tee /sys/bus/usb/drivers/smsc95xx/unbind &> /dev/null
  fi
  jackd -P84 -p128 -t2000 -d alsa -dhw:UA25 -p512 -n2 -r44100 -s -P -Xseq
&> /dev/null &
fi

This is the first section of the script. An if clause that checks if JACK is already running and if that’s not the case the system gets set up for low latency use, a simple check is done if there is an active WiFi adapter and if so the ethernet interface is disabled and then on the last line JACK is invoked. Notice the ALSA name used, hw:UA25, this could be different on your RPi, you can check with aplay -l.

jack_wait -w &> /dev/null

jack_wait is a simple app that does nothing else but checking if JACK is active, the -w option means to wait for JACK to become active.

if ! pidof linuxsampler &> /dev/null
then
  linuxsampler --instruments-db-location $HOME/LinuxSampler/instruments.db
&> /dev/null &
  sleep 5
netcat -q 3 localhost 8888
< $HOME/LinuxSampler/SalamanderGrandPianoV3.lscp &> /dev/null &
fi

This stanza checks if LinuxSampler is running, if not LinuxSampler is started and 5 seconds later the config file is pushed to the LinuxSampler backend with the help of netcat.

while [ "$STATUS" != "100" ]
do
  STATUS=$(echo "GET CHANNEL INFO 0" | netcat -q 3 localhost 8888
| grep INSTRUMENT_STATUS | cut -d " " -f 2 | tr -d 'rn')
done

A simple while loop that checks the load status of LinuxSampler. When the load status has reached 100% the script will move on.

jack_connect LinuxSampler:0 system:playback_1 &> /dev/null
jack_connect LinuxSampler:1 system:playback_2 &> /dev/null
#jack_connect alsa_pcm:MPK-mini/midi_capture_1 LinuxSampler:midi_in_0 &> /dev/null
jack_connect alsa_pcm:USB-Keystation-61es/midi_capture_1 LinuxSampler:midi_in_0
&> /dev/null

This part sets up the necessary JACK connections. The portnames of the MIDI devices can be different on your system, you can look them up with jack_lsp which will list all available JACK ports.

jack_midiseq Sequencer 176400 0 69 20000 22050 57 20000 44100 64 20000 66150 67 20000 &
sleep 4
jack_connect Sequencer:out LinuxSampler:midi_in_0
sleep 3.5
jack_disconnect Sequencer:out LinuxSampler:midi_in_0
killall jack_midiseq

This is the notification part of the script that will play four notes. It’s based on jack_midiseq, another JACK example tool that does nothing more but looping a sequence of notes. It’s an undocumented utility so I’ll explain how it is invoked:

jack_midiseq

<command> <JACK port name> <loop length> <start value> <MIDI note value> <length value>

Example:
jack_midiseq Sequencer 176400 0 69 20000 22050 57 20000 44100 64 20000 66150 67 20000

JACK port name: Sequencer
Loop length: 4 seconds at 44.1 KHz (176400/44100)
Start value of first note: 0
MIDI note value of first note: 69 (A4)
Length value: 20000 samples, so that's almost half a second
Start value of second note: 22050 (so half a second after the first note)
MIDI note value of second note: 57 (A3)
Length value: 20000 samples
Start value of third note: 44100 (so a second after the first note)
MIDI note value of second note: 64 (E4)
Length value: 20000 samples
Start value of third note: 66150 (so one second and a half after the first note)
MIDI note value of second note: 67 (G4)
Length value: 20000 samples

Now the script is finished, the last line calls exit with a status value of 0 which means the script was run successfully.

exit 0

After making the script executable with chmod +x ~/bin/piano and running it you can start playing piano with your Raspberry Pi! Again, bear in mind that the RPi is not made for this specific purpose so it could happen that audio starts to stutter every now and then, especially when you play busy parts or play more than 4 notes at once.


Using a Raspberry Pi as a piano: quick demo

Using a Raspberry Pi as a piano

Hacking an Android TV stick, the sequel

jeremy@rk3066:~$ uname -a
Linux rk3066 3.0.36-rt58 #1 SMP PREEMPT RT Thu Jul 4 13:18:23 CEST
2013 armv7l GNU/Linux

Managed to compile and run a real-time kernel on the Android TV stick with the RK3066 SoC. Packaged the latest version of amSynth (1.4.0 which has been released recently), installed it, fired up JACK and amSynth and so far no xruns, nothing. And this is with -p64!

jackd -P84 -p32 -t2000 -dalsa -dhw:Device -n3 -p64 -r44100 -s -P

I should measure the latency of the $2 USB audio interface I’m using to find out what the total latency of this set-up is. Well, at least I got the system latency for usage with softsynths like amSynth down to 64/44100*2=3ms. Now that’s a usable situation.

jeremy@rk3066:~$ lsusb | grep -i c-media
Bus 002 Device 006: ID 0d8c:000e C-Media Electronics, Inc. Audio Adapter (Planet
UP-100, Genius G-Talk)
jeremy@rk3066:~$ cat /proc/asound/cards 0 [RK29RK1000 ]: RK29_RK1000 - RK29_RK1000 RK29_RK1000 1 [HDMI ]: ROCKCHIP_HDMI - ROCKCHIP HDMI ROCKCHIP HDMI 2 [Device ]: USB-Audio - Generic USB Audio Device Generic USB Audio Device at usb-usb20_host-1.1, full speed

A big pro of this stick is that it suffers less from SD card corruption than my RPi. Yesterday evening I wrecked up yet another SD card when testing my RPi with a real-time kernel, it’s getting a bit cumbersome. Speaking of real-time kernels, it was quite some work to apply the RT patchset to the RockChip kernel source. Had to add stuff by hand and when I finally got everything in place it wouldn’t compile. But I managed to solve all the build errors. After flashing the kernel image the TV stick wouldn’t boot of course, it hung at some point. But I quickly saw that the issue was with the SD card reader and that it was similar to the SD card reader issue on the RPi for which I found a workaround. So I added an #ifdef clause to the RockChip SD card reader driver, recompiled, reflashed and wham, it continued booting. Now I have to clean up my build directory and get a usable diff of it against the pristine RK3066 kernel sources.

Hacking an Android TV stick, the sequel

More ARM goodies

Bought another Android TV stick based on the RK3066 SoC, the MK808 which is as far as I’ve understood kind of the default board to hack on.


MK808 Android TV stick

Also bought a BeagleBone Black development board. Why? Because apparently JACK runs well on it, also with USB interfaces (no need for the ALSA softmode option!) so I assume the USB implementation is better than those of the Raspberry Pi and the RK3066 based board I currently own. And I could get it cheaper over here in The Netherlands than other viable alternatives like the pcDuino or Cubieboard, also because of a coupon code I found on tweakers.net so I got a price reduction of a few Euros. Another reason why I bought it are the so-called capes that are available for this board. These capes are basically add-on boards and the cape that has my most attention is the audio cape. I’m thinking about buying that specific cape, solder two Neutriks on the audio in and out and turn it into the easiest DIY guitar effect box ever. Of course with guitarix loaded on it, the devs have done an incredible amount of work recently to get guitarix running flawlessly and painlessly on ARM dev boards like the BeagleBone Black.


BeagleBone Black


BeagleBone Audio Cape

More ARM goodies

Bricking the UG802 Android TV stick

Pulled out my soldering iron, soldered a reset button and a switch to boot into recovery on the PCB and connected my UG802 clone/revision to my TV. Nothing. lsusb. Crap, it boots in flash mode. Let’s try reflashing the whole bloody thing. Well that works so the NAND is not defective or anything. Reboot. Nothing, lsusb still reports the device is in flash mode. So I removed all my soldering efforts which I really regretted because it was quite nicely done given my poor soldering skills and tried again. Still nothing. Arrrggghhhh. Enjoyed a cold Warsteiner and let it rest.

Today I brought the device with me to the office. Hooked it up to a Windows machine, ran the ROM flash tool from Finless’ custom ROM package for this device and powered it up. I was greeted with the most ugly Android boot animation I had ever seen. But at least the device works again so thanks Finless!

So now I can move on again. I had Jack1 running on it so it should be possible to turn this device into a very cheap, yet powerful alternative to do real-time, low-latency audio. Compared to the Raspberry Pi JACK already consumed way less CPU (12% on the RPi compared to 2% on the RK3066 device with the same JACK settings) and I noticed the device has some more IRQ’s so if I could get all of those threaded that should give me some more flexibility to get everything working in a more stable way. I did have to disable WiFi otherwise the whole USB stack crashed after starting JACK. Also tried with an external WiFi dongle, same issue. I can even generate xruns when pressing keys on an attached keyboard. So it’d be really nice if I had serial console access to this thing. But I’ll figure that out too. And maybe the USB part of the kernel can be tweaked to improve things on the USB level.

Bricking the UG802 Android TV stick

Raspberry Pi als virtuele gitaarversterker

M’n Raspberry Pi in actie als virtuele gitaarversterker. Er draait Raspbian op met een gepatchte versie van Jack1 en de laatste versie van guitarix. Als geluidskaart gebruik ik m’n good old Edirol UA-25. Systeemlatency is 256/48000×3 = 16ms. Ik kan nog wat lager (8ms) maar dan trekt de RPi de preset die ik in dit videootje gebruik niet meer.

De gepatchte versie van Jack1 en de laatste versie van guitarix kun je in mijn RPi audio repository vinden. Staan ook nog wat andere pakketjes in die of nog niet beschikbaar zijn in de standaard repositories van Raspbian of die wat meer up to date zijn dan de  Raspbian pakketten. Hoe je die repository kunt toevoegen kun je terugvinden in mijn Wiki artikel Raspberry Pi and real-time, low-latency audio op linuxaudio.org.

Ben erachter gekomen dat ik niet de enige ben die hier mee bezig is, er is zelfs iemand die er een complete site aan het wijden is: Amp Brownie – Building a Raspberry Pi Guitar Rig

Raspberry Pi als virtuele gitaarversterker

JackLinx site online

De site van het JackLinx project is online gegaan: http://www.jacklinx.nl/

Dit is het project waar ik het in een eerdere blogpost al over had gehad, de educatieve muziekomgeving onder Linux die gebruik maakt o.a. JACK, mididings, QMidiRoute, QmidiNet, Qsynth en Bash scripts:

JackLinx is an application management framework that makes it possible for children and young music students to instantly start working with a complex array of inter-connected Linux Music and Audio applications.

The targeted use scenario is the primary or high school music classroom furnished with a a set of networked desktop or laptop computers, where a music teacher directs and guides a group of music students to perform various music educational assignments and activities using the JackLinx platform.

The JackLinx platform can be used for individual musical instruction and training, for small group work over the network and for live musical performances.

JackLinx aims to be a full featured but simple and flexible music laboratory for all ages that focuses on live musicking.

Ik ben hier ontzettend enthousiast over, vooral vanwege de keuzes van de auteur (Fred de Borst) en het feit dat het optimaal gebruik maakt van de mogelijkheden van Linux audio en Linux in het algemeen (JackLinx maakt bijvoorbeeld goed gebruik van meerdere desktops).


JackLinx op Lubuntu 11.10 met Gnome MPLayer, MuseScore, 9menu en VMPK

Volgende stap is de software geschikt maken om te distribueren en deze zal misschien her en der nog wat gefinetuned moeten worden. Ik ga proberen om de ontwikkelingen zoveel mogelijk te volgen hier op mijn blog.

JackLinx site online

DX

Oftewel DealExtreme. Eigenlijk een beetje herontdekt door de buurtgenoot die hier laatst op bezoek was. Hij had een oprolbaar USB drumpadje mee en dat vond ik zo’n cool ding, moest ik ook hebben. Uiteindelijk kwam ik dus uit op DealExtreme waar ik wel eerder spulletjes had besteld. Het gaat om dit drumpadje:

Niet aanslaggevoelig ofzo maar het padje stuurt wel keurig MIDI CC messages uit over MIDI kanaal 10. Ik heb zo’n idee dat dit één van de goedkoopste USB MIDI controllers is die je momenteel kunt krijgen. Ik denk dat ik ‘m ga demonteren om er een USB MIDI footswitch van te maken. Heb er gelijk een USB MIDI kabel bij besteld:

$5.99, dat kun je niet laten liggen toch? Ik ga deze gebruiken om mijn Boss FC-50 MIDI footswitch aan mijn Raspberry Pi te hangen. Ik kan namelijk de MIDI poorten op mijn Edirol UA-25 niet gebruiken aangezien deze het alleen doen als de UA-25 in Advanced mode staat en dat staat momenteel uit omdat anders JACK niet werkt op mijn RPi icm. de UA-25. Hopelijk werkt het wel met dit cheapo kabeltje. Binnenkort ga ik ook deze bestellen:

Ziet er bekend uit hè? Het is gewoon hetzelfde apparaat als de Behringer UCG102!

De UCG102 is al goedkoop (rond de €25,-) maar op DealExtreme kost dit apparaatje slechts $14.80! Samen met de USB MIDI kabel ga ik deze gebruiken met mijn RPi. Kijken of ik een cheapo customizable gitaarversterkeremulatieapparaatje kan bouwen voor minder dan €50,-.

DX

De wederopstanding van PHASEX

PHASEX leeft weer! De oorspronkelijke ontwikkelaar heeft de draad weer opgepakt en een nieuwe release uitgebracht. Heb er nog niet uitgebreid naar kunnen kijken maar hij heeft de boel flink onder handen genomen. Uiteraard zijn de nodige bugs gefikst maar daarnaast is de functionaliteit van PHASEX flink uitgebreid: je kan nu meerdere parts tegelijkertijd gebruiken (dus geen losse instances meer), support voor JACK MIDI en JACK Transport en PHASEX kan nu zonder GUI gebruikt worden. Ook heeft de GUI een update gehad en zijn er de nodige filters toegevoegd en bestaande filters verbeterd.

Al met al goed nieuws, PHASEX is een erg goed klinkende synthesizer waar je echt heel veel uit kan halen. Als de ontwikkelaar dit alles nou ook nog in een LV2 plug-in zou kunnen stoppen…


PHASEX-0.14.97

PHASEX 0.14.97

De wederopstanding van PHASEX